Guide - Trigger with NextJS
Creating Triggers with Next.js and Sherry SDK
This comprehensive guide will teach you step by step how to create powerful mini apps using Next.js and the Sherry Links SDK. Mini apps are dynamic applications that can be integrated into different platforms and allow users to interact with smart contracts seamlessly.
This tutorial contains specific notes for Minithon hackathon participants. If the Minithon has already concluded, please ignore these references - all the technical content and examples remain fully applicable for learning and testing dynamic actions in production.
This tutorial progresses from a basic example (simple transfer) to a complex example (smart contract interaction). For minithon submissions, you'll need to implement the complex version that interacts with smart contracts, as simple transfers can already be handled by our built-in TransferAction.
Action Flows are currently in their final development stage and have not yet been released. This functionality will be available in upcoming versions.
How Sherry Works - Understanding the Flow
Before we start building, it's important to understand how Sherry Links connects users, platforms, and your mini app backend. The following diagram illustrates the complete flow:
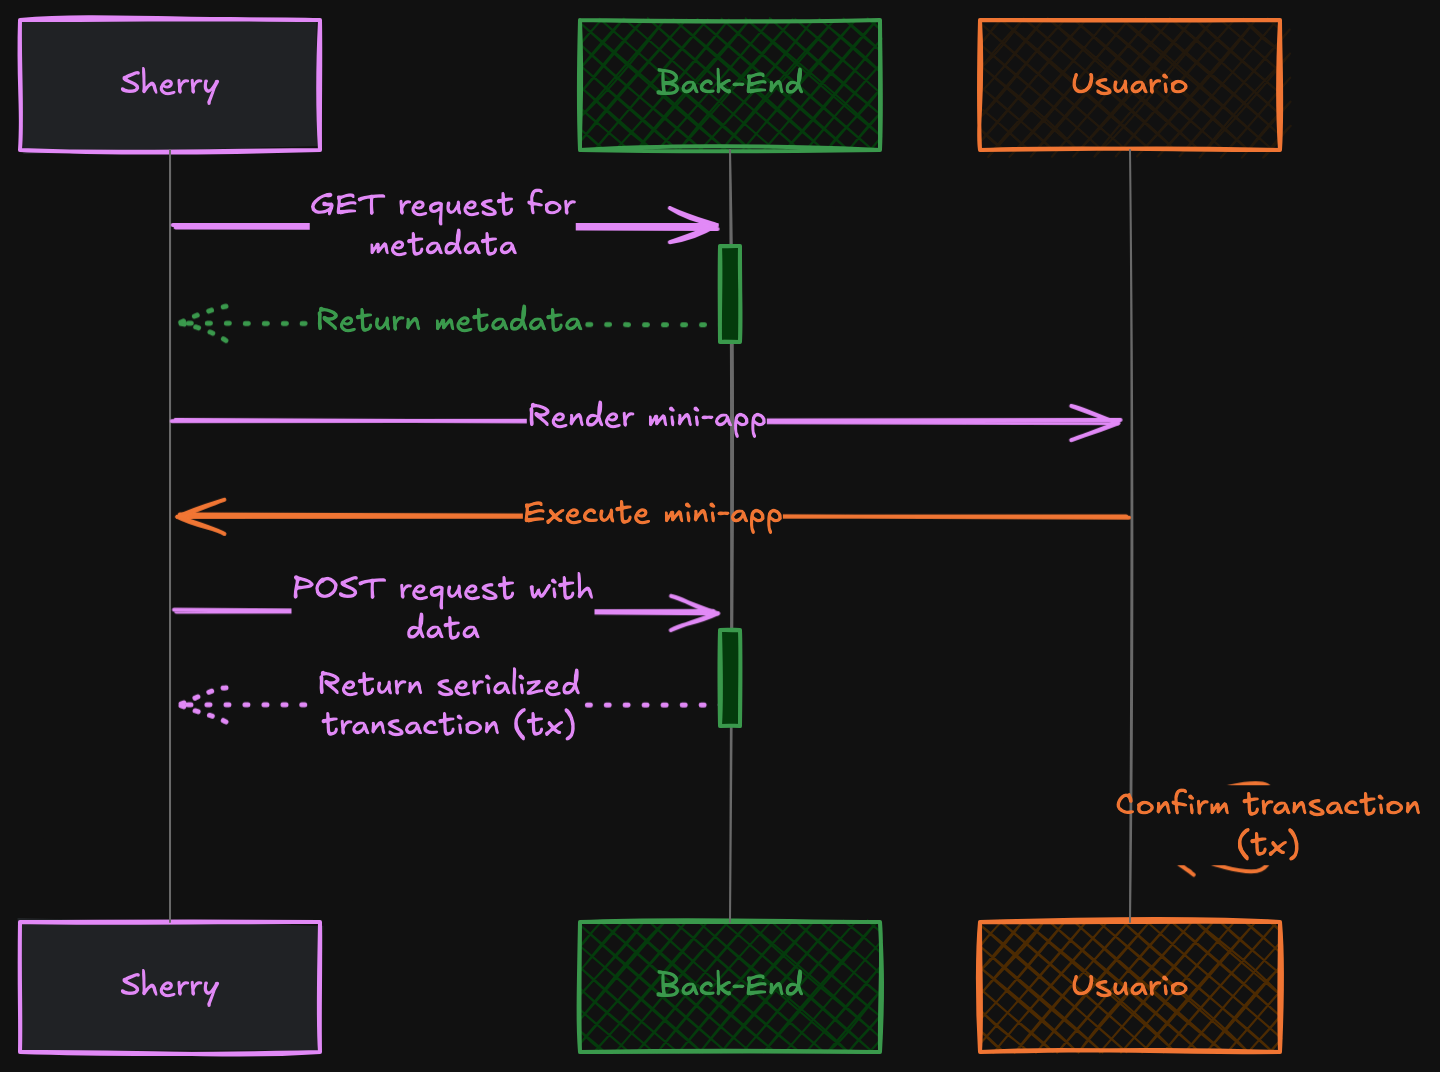
Step-by-Step Flow
-
Sherry makes GET request and receives metadata
- The platform discovers your mini app and requests its configuration
- Your backend responds with metadata that defines the UI and functionality
-
Back-End returns metadata
- Metadata includes form fields, action buttons, descriptions, and endpoints
- This tells Sherry how to render your mini app interface
-
Sherry renders mini-app
- The platform creates a user-friendly form based on your metadata
- Users can see input fields, descriptions, and action buttons
-
User executes mini-app
- User fills out the form with their desired parameters
- User clicks the action button to submit their request
-
Sherry makes POST request and receives serialized transaction from Back-End
- Platform sends user input to your backend for processing
- Your backend applies custom logic and returns a ready-to-sign blockchain transaction
-
User confirms transaction
- User reviews the transaction details in their wallet
- User signs and submits the transaction to the blockchain
Your mini app acts as a smart transaction factory - it takes user input, applies your unique business logic, and outputs ready-to-sign blockchain transactions. This is what makes Sherry Links powerful: combining great UX with custom blockchain functionality.
Prerequisites
- Node.js: Version 18.x or higher
- Package Manager:npm, yarn, or pnpm
- Framework Knowledge: Basic Next.js and TypeScript
- Blockchain Basics: Smart contracts and ABI understanding
Initial Setup
1. Create Next.js Project
- npm
- yarn
- pnpm
npx create-next-app@latest my-sherry-app --typescript --eslint --tailwind --src-dir --app --import-alias "@/*"
cd my-sherry-app
yarn create next-app my-sherry-app --typescript --eslint --tailwind --src-dir --app --import-alias "@/*"
cd my-sherry-app
pnpm create next-app my-sherry-app --typescript --eslint --tailwind --src-dir --app --import-alias "@/*"
cd my-sherry-app
2. Install Dependencies
- npm
- yarn
- pnpm
npm install @sherrylinks/sdk viem wagmi
yarn add @sherrylinks/sdk viem wagmi
pnpm add @sherrylinks/sdk viem wagmi
3. Configure Next.js (Optional)
To avoid build errors with ESLint, you can disable it in next.config.js:
/** @type {import('next').NextConfig} */
const nextConfig = {
  eslint: {
    ignoreDuringBuilds: true,
  },
};

module.exports = nextConfig;
Creating the GET Endpoint - Metadata
The GET endpoint is the heart of your mini app. Here you define all the information and structure that platforms need to render your application.
Metadata tells platforms how to render your mini app, what inputs to show users, and where to send the data when users interact with it.
1. Create the Route File
Create the file app/api/my-app/route.ts:
import { NextRequest, NextResponse } from 'next/server';
import { createMetadata, Metadata, ValidatedMetadata } from '@sherrylinks/sdk';
2. Set Up the Basic GET Handler Structure
export async function GET(req: NextRequest) {
  try {
    // Get server URL information
    const host = req.headers.get('host') || 'localhost:3000';
    const protocol = req.headers.get('x-forwarded-proto') || 'http';

    // Construct the base URL
    const serverUrl = `${protocol}://${host}`;

    // We'll build the metadata object step by step below
  } catch (error) {
    console.error('Error creating metadata:', error);
    return NextResponse.json({ error: 'Failed to create metadata' }, { status: 500 });
  }
}
This automatically detects whether you're running locally (http://localhost:3000) or in
production (https://yourdomain.com) and constructs the correct base URL for your mini app.
3. Define Basic App Information
export async function GET(req: NextRequest) {
  try {
    const host = req.headers.get('host') || 'localhost:3000';
    const protocol = req.headers.get('x-forwarded-proto') || 'http';
    const serverUrl = `${protocol}://${host}`;

    const metadata: Metadata = {
      url: 'https://sherry.social',
      icon: 'https://avatars.githubusercontent.com/u/117962315',
      title: 'Timestamped Message',
      baseUrl: serverUrl,
      description: 'Store a message with an optimized timestamp calculated by our algorithm',
      // Actions will be added in the next step
    };
  } catch (error) {
    // Error handling...
  }
}
Understanding Each Field
| Field | Description | Example |
|---|---|---|
| url | Main website URL for your project | "https://sherry.social" |
| icon | Publicly accessible image URL (200x200px recommended) | "https://example.com/icon.png" |
| title | Short, descriptive name for your mini app | "Timestamped Message" |
| baseUrl | Server URL where your mini app is hosted (auto-detected) | "https://yourdomain.com" |
| description | Clear explanation of what your mini app does | "Store messages with optimized timestamps" |
4. Add Actions Array
Actions define what users can do with your mini app. Each action represents a button with specific functionality.
const metadata: Metadata = {
  url: 'https://sherry.social',
  icon: 'https://avatars.githubusercontent.com/u/117962315',
  title: 'Timestamped Message',
  baseUrl: serverUrl,
  description: 'Store a message with an optimized timestamp calculated by our algorithm',
  actions: [
    {
      type: 'dynamic',
      label: 'Store Message',
      description: 'Store your message with a custom timestamp calculated for optimal storage',
      chains: { source: 43113 },
      path: `/api/my-app`,
      // Parameters will be added in the next step
    },
  ],
};
Understanding Action Properties
- type: Always use
"dynamic"for complex mini apps that need custom logic - label: The text that will appear on the action button
- description: Explanation of what this specific action does
- chains.source: The blockchain where the transaction will execute (chain ID)
43113= Avalanche Fuji Testnet43114= Avalanche Mainnet
- path: The API endpoint that will handle the POST request
5. Configure User Input Parameters
const metadata: Metadata = {
  url: 'https://sherry.social',
  icon: 'https://avatars.githubusercontent.com/u/117962315',
  title: 'Timestamped Message',
  baseUrl: serverUrl,
  description: 'Store a message with an optimized timestamp calculated by our algorithm',
  actions: [
    {
      type: 'dynamic',
      label: 'Store Message',
      description: 'Store your message with a custom timestamp calculated for optimal storage',
      chains: { source: 43113 },
      path: `/api/my-app`,
      params: [
        {
          name: 'message',
          label: 'Your Message',
          type: 'text',
          required: true,
          description: 'Enter the message you want to store on the blockchain',
        },
      ],
    },
  ],
};
"text": Single-line text input -"textarea": Multi-line text input -"number": Numeric input with validation -"email": Email input with validation -"url": URL input with validation -"select": Dropdown selection -"radio": Radio button selection -"boolean": Checkbox input -"address": Blockchain address input -"file": File upload input -"image": Image upload input (Refer to the Parameters API documentation for full details)
6. Validate and Return the Metadata
export async function GET(req: NextRequest) {
  try {
    const host = req.headers.get('host') || 'localhost:3000';
    const protocol = req.headers.get('x-forwarded-proto') || 'http';
    const serverUrl = `${protocol}://${host}`;

    const metadata: Metadata = {
      url: 'https://sherry.social',
      icon: 'https://avatars.githubusercontent.com/u/117962315',
      title: 'Timestamped Message',
      baseUrl: serverUrl,
      description: 'Store a message with an optimized timestamp calculated by our algorithm',
      actions: [
        {
          type: 'dynamic',
          label: 'Store Message',
          description: 'Store your message with a custom timestamp calculated for optimal storage',
          chains: { source: 43113 },
          path: `/api/my-app`,
          params: [
            {
              name: 'message',
              label: 'Your Message',
              type: 'text',
              required: true,
              description: 'Enter the message you want to store on the blockchain',
            },
          ],
        },
      ],
    };

    // Validate metadata using the SDK
    const validated: ValidatedMetadata = createMetadata(metadata);

    // Return with CORS headers for cross-origin access
    return NextResponse.json(validated, {
      headers: {
        'Access-Control-Allow-Origin': '*',
        'Access-Control-Allow-Methods': 'GET, POST, PUT, DELETE, OPTIONS',
      },
    });
  } catch (error) {
    console.error('Error creating metadata:', error);
    return NextResponse.json({ error: 'Failed to create metadata' }, { status: 500 });
  }
}
The createMetadata() function validates your metadata structure and ensures it meets the Sherry
SDK requirements before returning it to the platform.
Example 1: Simple Transfer (Learning Only)
This example is for learning basic concepts only. Simple transfers like this are already
supported by our built-in TransferAction and will NOT be accepted in minithon submissions.
Use this to understand the flow, then move to Example 2 for minithon-ready functionality.
Understanding the POST Request Flow
When a user fills out your mini app form and clicks the action button, the platform will send a POST request to your endpoint with the user's input as URL parameters.
1. Set Up the POST Handler Structure
Add these imports at the top of your file:
import { NextRequest, NextResponse } from 'next/server';
import { avalancheFuji } from 'viem/chains';
import { createMetadata, Metadata, ValidatedMetadata, ExecutionResponse } from '@sherrylinks/sdk';
import { serialize } from 'wagmi';
Now let's build the POST handler:
- Basic Structure
- With Validation
export async function POST(req: NextRequest) {
  try {
    // Step 1: Extract parameters from the URL
    const { searchParams } = new URL(req.url);
    const message = searchParams.get('message');

    // We'll add validation and transaction creation below
  } catch (error) {
    console.error('Error in POST request:', error);
    return NextResponse.json({ error: 'Internal Server Error' }, { status: 500 });
  }
}
export async function POST(req: NextRequest) {
  try {
    // Extract parameters
    const { searchParams } = new URL(req.url);
    const message = searchParams.get('message');

    // Validate required parameters
    if (!message) {
      return NextResponse.json(
        { error: 'Message parameter is required' },
        {
          status: 400,
          headers: {
            'Access-Control-Allow-Origin': '*',
            'Access-Control-Allow-Methods': 'GET, POST, PUT, DELETE, OPTIONS',
            'Access-Control-Allow-Headers': 'Content-Type, Authorization',
          },
        },
      );
    }

    // Transaction creation will be added next
  } catch (error) {
    // Error handling...
  }
}
2. Create the Transaction Object
// Create a simple transfer transaction
const tx = {
  to: '0x5ee75a1B1648C023e885E58bD3735Ae273f2cc52',
  value: BigInt(1000000), // 1000000 wei = 0.000001 AVAX
  chainId: avalancheFuji.id,
};
Understanding Transaction Properties
- to: The destination address that will receive the transfer
- value: The amount to transfer in wei (smallest unit). Use
BigInt()for large numbers - chainId: The numeric ID of the blockchain (avalancheFuji.id = 43113)
3. Complete Simple Transfer Example
export async function POST(req: NextRequest) {
  try {
    const { searchParams } = new URL(req.url);
    const message = searchParams.get('message');

    if (!message) {
      return NextResponse.json(
        { error: 'Message parameter is required' },
        {
          status: 400,
          headers: {
            'Access-Control-Allow-Origin': '*',
            'Access-Control-Allow-Methods': 'GET, POST, PUT, DELETE, OPTIONS',
            'Access-Control-Allow-Headers': 'Content-Type, Authorization',
          },
        },
      );
    }

    const tx = {
      to: '0x5ee75a1B1648C023e885E58bD3735Ae273f2cc52',
      value: BigInt(1000000),
      chainId: avalancheFuji.id,
    };

    // Serialize the transaction for the blockchain
    const serialized = serialize(tx);

    // Create the response object that Sherry expects
    const resp: ExecutionResponse = {
      serializedTransaction: serialized,
      chainId: avalancheFuji.id, // Use the chain ID
    };

    // Return the response with CORS headers
    return NextResponse.json(resp, {
      status: 200,
      headers: {
        'Access-Control-Allow-Origin': '*',
        'Access-Control-Allow-Methods': 'GET, POST, PUT, DELETE, OPTIONS',
        'Access-Control-Allow-Headers': 'Content-Type, Authorization',
      },
    });
  } catch (error) {
    console.error('Error in POST request:', error);
    return NextResponse.json({ error: 'Internal Server Error' }, { status: 500 });
  }
}
This example only performs a simple token transfer. Since our platform already provides TransferAction for this exact functionality, minithon submissions need to demonstrate more complex, value-added functionality.
Example 2: Smart Contract Interaction (Minithon Ready)
This example demonstrates smart contract interaction with custom business logic, which is what we're looking for in minithon submissions.
1. Understanding the Smart Contract
First, let's understand what our smart contract does:
 // SPDX-License-Identifier: MIT
pragma solidity ^0.8.17;

/**
 * @title TimestampedMessage
 * @dev Stores messages with an optimized timestamp
 */
contract TimestampedMessage {
    event MessageStored(address indexed sender, string message, uint256 timestamp, uint256 optimizedTimestamp);

    struct MessageData {
        address sender;
        string message;
        uint256 timestamp;
        uint256 optimizedTimestamp;
    }

    // Array to store all messages
    MessageData[] public messages;

    // Mapping from address to their message count
    mapping(address => uint256) public userMessageCount;

    /**
     * @dev Store a message with an optimized timestamp
     * @param message The message to store
     * @param optimizedTimestamp A timestamp calculated off-chain
     */
    function storeMessage(string memory message, uint256 optimizedTimestamp) public {
        // Store message with the current block timestamp and the optimized timestamp
        messages.push(MessageData({
            sender: msg.sender,
            message: message,
            timestamp: block.timestamp,
            optimizedTimestamp: optimizedTimestamp
        }));

        // Increment message count for the sender
        userMessageCount[msg.sender]++;

        // Emit event
        emit MessageStored(msg.sender, message, block.timestamp, optimizedTimestamp);
    }

    /**
     * @dev Get the count of all messages
     */
    function getMessageCount() public view returns (uint256) {
        return messages.length;
    }

    /**
     * @dev Get a message by index
     */
    function getMessage(uint256 index) public view returns (
        address sender,
        string memory message,
        uint256 timestamp,
        uint256 optimizedTimestamp
    ) {
        require(index < messages.length, "Index out of bounds");
        MessageData memory data = messages[index];
        return (data.sender, data.message, data.timestamp, data.optimizedTimestamp);
    }

    /**
     * @dev Get all messages from a specific sender
     */
    function getMessagesBySender(address sender) public view returns (
        string[] memory messageTexts,
        uint256[] memory timestamps,
        uint256[] memory optimizedTimestamps
    ) {
        uint256 count = userMessageCount[sender];

        messageTexts = new string[](count);
        timestamps = new uint256[](count);
        optimizedTimestamps = new uint256[](count);

        uint256 currentIndex = 0;

        for (uint256 i = 0; i < messages.length; i++) {
            if (messages[i].sender == sender) {
                messageTexts[currentIndex] = messages[i].message;
                timestamps[currentIndex] = messages[i].timestamp;
                optimizedTimestamps[currentIndex] = messages[i].optimizedTimestamp;
                currentIndex++;
            }
        }

        return (messageTexts, timestamps, optimizedTimestamps);
    }
}
- Custom business logic (optimized timestamp calculation) - Smart contract state management - Event emission for tracking - Complex data structures - Goes beyond simple transfers
2. Configure the Contract ABI
The ABI (Application Binary Interface) is essential for interacting with smart contracts. It defines the available functions, their parameters, and return types. Without the correct ABI, you won't be able to encode contract function calls.
Create the file blockchain/abi.ts in your project:
export const abi = [
  {
    anonymous: false,
    inputs: [
      {
        indexed: true,
        internalType: 'address',
        name: 'sender',
        type: 'address',
      },
      {
        indexed: false,
        internalType: 'string',
        name: 'message',
        type: 'string',
      },
      {
        indexed: false,
        internalType: 'uint256',
        name: 'timestamp',
        type: 'uint256',
      },
      {
        indexed: false,
        internalType: 'uint256',
        name: 'optimizedTimestamp',
        type: 'uint256',
      },
    ],
    name: 'MessageStored',
    type: 'event',
  },
  {
    inputs: [
      {
        internalType: 'string',
        name: 'message',
        type: 'string',
      },
      {
        internalType: 'uint256',
        name: 'optimizedTimestamp',
        type: 'uint256',
      },
    ],
    name: 'storeMessage',
    outputs: [],
    stateMutability: 'nonpayable',
    type: 'function',
  },
  {
    inputs: [
      {
        internalType: 'uint256',
        name: 'index',
        type: 'uint256',
      },
    ],
    name: 'getMessage',
    outputs: [
      {
        internalType: 'address',
        name: 'sender',
        type: 'address',
      },
      {
        internalType: 'string',
        name: 'message',
        type: 'string',
      },
      {
        internalType: 'uint256',
        name: 'timestamp',
        type: 'uint256',
      },
      {
        internalType: 'uint256',
        name: 'optimizedTimestamp',
        type: 'uint256',
      },
    ],
    stateMutability: 'view',
    type: 'function',
  },
  {
    inputs: [],
    name: 'getMessageCount',
    outputs: [
      {
        internalType: 'uint256',
        name: '',
        type: 'uint256',
      },
    ],
    stateMutability: 'view',
    type: 'function',
  },
  {
    inputs: [
      {
        internalType: 'address',
        name: 'sender',
        type: 'address',
      },
    ],
    name: 'getMessagesBySender',
    outputs: [
      {
        internalType: 'string[]',
        name: 'messageTexts',
        type: 'string[]',
      },
      {
        internalType: 'uint256[]',
        name: 'timestamps',
        type: 'uint256[]',
      },
      {
        internalType: 'uint256[]',
        name: 'optimizedTimestamps',
        type: 'uint256[]',
      },
    ],
    stateMutability: 'view',
    type: 'function',
  },
  {
    inputs: [
      {
        internalType: 'uint256',
        name: '',
        type: 'uint256',
      },
    ],
    name: 'messages',
    outputs: [
      {
        internalType: 'address',
        name: 'sender',
        type: 'address',
      },
      {
        internalType: 'string',
        name: 'message',
        type: 'string',
      },
      {
        internalType: 'uint256',
        name: 'timestamp',
        type: 'uint256',
      },
      {
        internalType: 'uint256',
        name: 'optimizedTimestamp',
        type: 'uint256',
      },
    ],
    stateMutability: 'view',
    type: 'function',
  },
  {
    inputs: [
      {
        internalType: 'address',
        name: '',
        type: 'address',
      },
    ],
    name: 'userMessageCount',
    outputs: [
      {
        internalType: 'uint256',
        name: '',
        type: 'uint256',
      },
    ],
    stateMutability: 'view',
    type: 'function',
  },
] as const;
- Remix: After compiling, go to the
solidity compilertab and look for theABIath the bottom of the page - Hardhat: Automatically generated in
artifacts/contracts/ - Foundry: Use
forge inspect <ContractName> abi - Blockchain Explorer: If the contract is verified, you can copy the ABI
3. Update Your Route File Imports
import { NextRequest, NextResponse } from 'next/server';
import { avalancheFuji } from 'viem/chains';
import { createMetadata, Metadata, ValidatedMetadata, ExecutionResponse } from '@sherrylinks/sdk';
import { serialize } from 'wagmi';
import { encodeFunctionData, TransactionSerializable } from 'viem';
import { abi } from '@/blockchain/abi';

// Contract address on Avalanche Fuji Testnet
const CONTRACT_ADDRESS = '0xYourSmartContractAddressHere';
4. Build the Smart Contract POST Handler
- Step 1: Validation
- Step 2: Custom Logic
- Step 3: Contract Transaction
export async function POST(req: NextRequest) {
  try {
    // Extract user input
    const { searchParams } = new URL(req.url);
    const message = searchParams.get('message');

    // Validate required parameters
    if (!message) {
      return NextResponse.json(
        { error: 'Message parameter is required' },
        {
          status: 400,
          headers: {
            'Access-Control-Allow-Origin': '*',
            'Access-Control-Allow-Methods': 'GET, POST, PUT, DELETE, OPTIONS',
            'Access-Control-Allow-Headers': 'Content-Type, Authorization',
          },
        },
      );
    }

    // Custom logic and transaction creation will be added below
  } catch (error) {
    console.error('Error in POST request:', error);
    return NextResponse.json({ error: 'Internal Server Error' }, { status: 500 });
  }
}
export async function POST(req: NextRequest) {
  try {
    const { searchParams } = new URL(req.url);
    const message = searchParams.get('message');

    if (!message) {
      // Validation error...
    }

    // CUSTOM BUSINESS LOGIC: Calculate optimized timestamp
    // This is what makes your mini app unique and valuable
    const optimizedTimestamp = calculateOptimizedTimestamp(message);

    console.log(`Processing message: "${message}"`);
    console.log(`Optimized timestamp: ${optimizedTimestamp}`);

    // Transaction creation will be added next
  } catch (error) {
    // Error handling...
  }
}
export async function POST(req: NextRequest) {
  try {
    const { searchParams } = new URL(req.url);
    const message = searchParams.get('message');

    if (!message) {
      // Validation...
    }

    const optimizedTimestamp = calculateOptimizedTimestamp(message);

    // Encode the contract function data
    const data = encodeFunctionData({
      abi: abi,
      functionName: 'storeMessage',
      args: [message, BigInt(optimizedTimestamp)],
    });

    // Create smart contract interaction transaction
    const tx: TransactionSerializable = {
      to: CONTRACT_ADDRESS,
      data: data,
      chainId: avalancheFuji.id,
      type: 'legacy',
    };

    // Serialization and response will be added next
  } catch (error) {
    // Error handling...
  }
}
Understanding Smart Contract Transaction Properties
- to: The deployed contract address on the blockchain
- data: The encoded function data using
encodeFunctionData - chainId: The numeric ID of the blockchain (avalancheFuji.id = 43113)
- type: The transaction type ('legacy' for broad compatibility)
5. Complete Smart Contract Handler
export async function POST(req: NextRequest) {
  try {
    const { searchParams } = new URL(req.url);
    const message = searchParams.get('message');

    if (!message) {
      return NextResponse.json(
        { error: 'Message parameter is required' },
        {
          status: 400,
          headers: {
            'Access-Control-Allow-Origin': '*',
            'Access-Control-Allow-Methods': 'GET, POST, PUT, DELETE, OPTIONS',
            'Access-Control-Allow-Headers': 'Content-Type, Authorization',
          },
        },
      );
    }

    // Calculate optimized timestamp using custom algorithm
    const optimizedTimestamp = calculateOptimizedTimestamp(message);

    // Encode the contract function data
    const data = encodeFunctionData({
      abi: abi,
      functionName: 'storeMessage',
      args: [message, BigInt(optimizedTimestamp)],
    });

    // Create smart contract transaction
    const tx: TransactionSerializable = {
      to: CONTRACT_ADDRESS,
      data: data,
      chainId: avalancheFuji.id,
      type: 'legacy',
    };

    // Serialize transaction
    const serialized = serialize(tx);

    // Create response
    const resp: ExecutionResponse = {
      serializedTransaction: serialized,
      chainId: avalancheFuji.id,
    };

    return NextResponse.json(resp, {
      status: 200,
      headers: {
        'Access-Control-Allow-Origin': '*',
        'Access-Control-Allow-Methods': 'GET, POST, PUT, DELETE, OPTIONS',
        'Access-Control-Allow-Headers': 'Content-Type, Authorization',
      },
    });
  } catch (error) {
    console.error('Error in POST request:', error);
    return NextResponse.json({ error: 'Internal Server Error' }, { status: 500 });
  }
}
6. Implement the Custom Algorithm
This is where you add unique value to your mini app. The more sophisticated your algorithm, the more impressive your minithon submission will be!
// Custom algorithm to calculate optimized timestamp based on message content
function calculateOptimizedTimestamp(message: string): number {
  // Get the current timestamp as a starting point
  const currentTimestamp = Math.floor(Date.now() / 1000);

  // Custom algorithm: Add character codes to create a unique offset
  // This is your unique business logic - you can make this as complex as needed
  let offset = 0;

  for (let i = 0; i < message.length; i++) {
    // Sum character codes and use position as a multiplier
    offset += message.charCodeAt(i) * (i + 1);
  }

  // Ensure offset is reasonable (1 hour max)
  const maxOffset = 3600;
  offset = offset % maxOffset;

  // Calculate final optimized timestamp
  return currentTimestamp + offset;
}
- Creates deterministic but unique timestamps based on message content - Adds meaningful business logic beyond simple transfers - Can be expanded with more sophisticated algorithms - Provides real utility for timestamp optimization
CORS Handling
It's crucial to configure CORS before testing or deploying your mini app. Without proper CORS configuration, your mini app won't work when accessed from external platforms like the Sherry debugger or third-party applications.
To allow your mini app to be used from different domains and platforms, you need to handle CORS preflight requests:
export async function OPTIONS(request: NextRequest) {
  return new NextResponse(null, {
    status: 204, // No Content
    headers: {
      'Access-Control-Allow-Origin': '*',
      'Access-Control-Allow-Methods': 'GET, POST, PUT, DELETE, OPTIONS',
      'Access-Control-Allow-Headers':
        'Content-Type, Authorization, X-CSRF-Token, X-Requested-With, Accept, Accept-Version, Content-Length, Content-MD5, Date, X-Api-Version',
    },
  });
}
When platforms try to use your mini app from a different domain, browsers first send an OPTIONS request to check if cross-origin requests are allowed. This handler tells the browser that your API accepts requests from any domain.
CORS Headers in All Responses
Make sure to include CORS headers in all your API responses:
headers: {
  'Access-Control-Allow-Origin': '*',
  'Access-Control-Allow-Methods': 'GET, POST, PUT, DELETE, OPTIONS',
  'Access-Control-Allow-Headers': 'Content-Type, Authorization',
}
Testing Your Trigger
Option 1: Sherry Social App
- Go to https://app.sherry.social/home
- In the address field, enter your GET endpoint URL
- Example:
http://localhost:3000/api/my-app(for local development) - The platform will automatically render your mini app
Option 2: Sherry Debugger (Recommended for Development)
The debugger is specifically designed for testing and debugging mini apps during development with multiple input methods.
To test your mini app in the debugger, you must first deploy it to a hosting provider like Vercel. The debugger needs a publicly accessible URL to be able to load your mini app. If you want to test locally, use the JSON method by copying the response from your local GET endpoint and pasting it into the debugger.
- URL Testing (Recommended)
- JSON Testing (For Local Testing)
- TypeScript Testing
- Deploy your mini app to Vercel:
vercel --prod
- URL Testing:
- Paste your deployed GET endpoint URL
- Example:
https://my-sherry-app.vercel.app/api/my-app - Click "Load" to render your mini app
- Go to https://app.sherry.social/debugger
- For local testing only:
- Visit your GET endpoint directly:
http://localhost:3000/api/my-app - Copy the entire JSON response
- Paste it into the debugger's JSON input
- This is useful for testing metadata during development
- Visit your GET endpoint directly:
- Copy your metadata object from your TypeScript code
- Paste it directly into the debugger
- Good for rapid iteration on metadata structure
Step-by-Step Testing Process
-
Develop Locally
- Run
npm run dev - Test at
localhost:3000/api/my-app
- Run
-
Deploy to Vercel
vercel --prod- Get public URL
-
Test in Debugger
- Use public deployment URL
- Verify complete rendering
-
Test Functionality
- Fill out form and test POST
- Verify generated transaction
Minithon Guidelines
What Makes a Winning Minithon Submission
- Technical Merit
- Creativity & Innovation
- Good Ideas (Examples)
Key Technical Aspects:
- Multiple Parameters: Sophisticated data handling and creative input combinations.
- Error Handling: User-friendly error messages and robust validation.
- Innovative Algorithms: Complex data processing, unique calculations, or on-chain/off-chain logic.
- Parameter Combinations: Creative input combinations and validations that enhance usability or functionality.
- Practical Applications: Real utility for blockchain users, solving a genuine problem or offering a novel service.
Factors for Creativity:
- Unique Use Cases: Solve real problems that users face in a novel way.
- Innovative Algorithms: Implement complex or unique data processing and calculations.
- Practical Applications: Demonstrate real utility and value for blockchain users.
Examples of Good Ideas (but not limited to):
- A tool that analyzes wallet history to suggest DeFi optimizations.
- A Trigger for creating and managing multi-signature Gnosis Safe transactions with a simplified UI.
- A dynamic NFT minting Trigger where traits are determined by off-chain data or user inputs.
- A prediction market interface that interacts with a specific smart contract.
What Won't Be Accepted in Minithon
- Simple token transfers (use our TransferAction instead)
- Copy-paste examples without meaningful modifications
- Mini apps that do not interact with smart contracts
- Broken implementations that do not work end-to-end
Troubleshooting
- GET Endpoint Issues
- POST Endpoint Issues
- Smart Contract Issues
Error: "Metadata validation failed"
Symptoms: Mini app doesn't load in debugger
- Check that all required fields are present in metadata - Verify data types match expected format
- Use
createMetadata()to validate structure - Check console for specific validation errors
try {
  const validated = createMetadata(metadata);
  console.log('Metadata validation successful:', validated);
} catch (error) {
  console.error('Metadata validation failed:', error);
}
Error: "CORS policy blocks request"
Symptoms: "Access to fetch has been blocked by CORS policy"
headers: {
  "Access-Control-Allow-Origin": "*",
  "Access-Control-Allow-Methods": "GET, POST, PUT, DELETE, OPTIONS",
  "Access-Control-Allow-Headers": "Content-Type, Authorization",
}
Error: "Parameter required"
Symptoms: Error about missing parameters
console.log('All parameters:', Object.fromEntries(searchParams.entries()));
console.log('Message parameter:', searchParams.get('message'));
Error: "Transaction serialization failed"
Symptoms: Error during serialize() call
- Use
BigInt(1000000)not1000000for large numbers - Verify chainId is correct for target network - Ensure all required transaction fields are present - For contract calls, verify ABI matches deployed contract
Error: "ABI function not found"
Symptoms: Error about missing or incorrect function
- Verify function name exactly matches contract (case-sensitive) - Check that function is public in smart contract - Ensure ABI is complete and includes the function - Verify parameter types match contract function signature
Error: "Invalid contract address"
Symptoms: Transaction fails with address-related errors
- Verify contract is deployed to correct network (Fuji testnet)
- Check address is properly formatted (starts with 0x)
- Ensure correct contract address for your network
- Verify contract is verified on blockchain explorer
Complete Code Example
Here's a complete, minithon-ready route file that demonstrates all concepts:
import { NextRequest, NextResponse } from 'next/server';
import { avalancheFuji } from 'viem/chains';
import { createMetadata, Metadata, ValidatedMetadata, ExecutionResponse } from '@sherrylinks/sdk';
import { serialize } from 'wagmi';
import { encodeFunctionData, TransactionSerializable } from 'viem';
import { abi } from '@/blockchain/abi';

const CONTRACT_ADDRESS = '0xYourSmartContractOnFuji';

export async function GET(req: NextRequest) {
  try {
    const host = req.headers.get('host') || 'localhost:3000';
    const protocol = req.headers.get('x-forwarded-proto') || 'http';
    const serverUrl = `${protocol}://${host}`;

    const metadata: Metadata = {
      url: 'https://sherry.social',
      icon: 'https://avatars.githubusercontent.com/u/117962315',
      title: 'Timestamped Message',
      baseUrl: serverUrl,
      description: 'Store a message with an optimized timestamp calculated by our algorithm',
      actions: [
        {
          type: 'dynamic',
          label: 'Store Message',
          description: 'Store your message with a custom timestamp calculated for optimal storage',
          chains: { source: 43113 },
          path: `/api/my-app`,
          params: [
            {
              name: 'message',
              label: 'Your Message',
              type: 'text',
              required: true,
              description: 'Enter the message you want to store on the blockchain',
            },
          ],
        },
      ],
    };

    const validated: ValidatedMetadata = createMetadata(metadata);

    return NextResponse.json(validated, {
      headers: {
        'Access-Control-Allow-Origin': '*',
        'Access-Control-Allow-Methods': 'GET, POST, PUT, DELETE, OPTIONS',
      },
    });
  } catch (error) {
    return NextResponse.json({ error: 'Failed to create metadata' }, { status: 500 });
  }
}

export async function POST(req: NextRequest) {
  try {
    const { searchParams } = new URL(req.url);
    const message = searchParams.get('message');

    if (!message) {
      return NextResponse.json(
        { error: 'Message parameter is required' },
        {
          status: 400,
          headers: {
            'Access-Control-Allow-Origin': '*',
            'Access-Control-Allow-Methods': 'GET, POST, PUT, DELETE, OPTIONS',
            'Access-Control-Allow-Headers': 'Content-Type, Authorization',
          },
        },
      );
    }

    // Custom business logic
    const optimizedTimestamp = calculateOptimizedTimestamp(message);

    // Smart contract interaction
    const data = encodeFunctionData({
      abi: abi,
      functionName: 'storeMessage',
      args: [message, BigInt(optimizedTimestamp)],
    });

    const tx: TransactionSerializable = {
      to: CONTRACT_ADDRESS,
      data: data,
      chainId: avalancheFuji.id,
      type: 'legacy',
    };

    const serialized = serialize(tx);

    const resp: ExecutionResponse = {
      serializedTransaction: serialized,
      chainId: avalancheFuji.id,
    };

    return NextResponse.json(resp, {
      status: 200,
      headers: {
        'Access-Control-Allow-Origin': '*',
        'Access-Control-Allow-Methods': 'GET, POST, PUT, DELETE, OPTIONS',
        'Access-Control-Allow-Headers': 'Content-Type, Authorization',
      },
    });
  } catch (error) {
    console.error('Error in POST request:', error);
    return NextResponse.json({ error: 'Internal Server Error' }, { status: 500 });
  }
}

export async function OPTIONS(request: NextRequest) {
  return new NextResponse(null, {
    status: 204,
    headers: {
      'Access-Control-Allow-Origin': '*',
      'Access-Control-Allow-Methods': 'GET, POST, PUT, DELETE, OPTIONS',
      'Access-Control-Allow-Headers':
        'Content-Type, Authorization, X-CSRF-Token, X-Requested-With, Accept, Accept-Version, Content-Length, Content-MD5, Date, X-Api-Version',
    },
  });
}

// Custom algorithm - this is where you add your unique value
function calculateOptimizedTimestamp(message: string): number {
  const currentTimestamp = Math.floor(Date.now() / 1000);

  let offset = 0;

  for (let i = 0; i < message.length; i++) {
    offset += message.charCodeAt(i) * (i + 1);
  }

  const maxOffset = 3600;
  offset = offset % maxOffset;

  return currentTimestamp + offset;
}
Example Repository
You can find complete working examples in our repository: SherryLabs/sherry-example
This repository contains:
- Both simple transfer and smart contract examples
- Complete smart contract code with Solidity source
- Deployment scripts and configuration
- ABI files and setup instructions
- Multiple parameter examples
- Advanced testing utilities
- Comprehensive documentation
Next Steps
- For Learning
- For Minithon Participants
- Deployment Considerations
- Start with the simple transfer example to understand the flow
- Move to the smart contract example once comfortable
- Experiment with different parameter types and validations
- Test thoroughly using the debugger
- Skip the simple transfer - go directly to smart contract interaction
- Design your unique algorithm - what problem will you solve?
- Plan your smart contract - what functions and data do you need?
- Create multiple parameters - make it sophisticated and useful
- Test extensively - ensure everything works perfectly
- Document your innovation - explain why your solution is unique
- Local Development: Use
http://localhost:3000for testing - Production: Deploy to Vercel, Netlify, or your preferred platform
- Custom Domains: Update your metadata URLs to match your domain
- Environment Variables: Store sensitive data like private keys securely
- Testing Networks: Start with Fuji testnet, then move to mainnet
Ready to Build Something Amazing?
Remember, the key to a successful minithon submission is not just making it work, but making it useful, innovative, and technically impressive. Focus on solving real problems with creative solutions that demonstrate the power of blockchain technology combined with great user experience.
Good luck with your mini app development and minithon submission!